How Do I Submit a Data Entry?

To submit a data entry:

  1. Click the Data Entry tab in the navigation panel to access Data Entry. The Clinical Data Entry window displays.

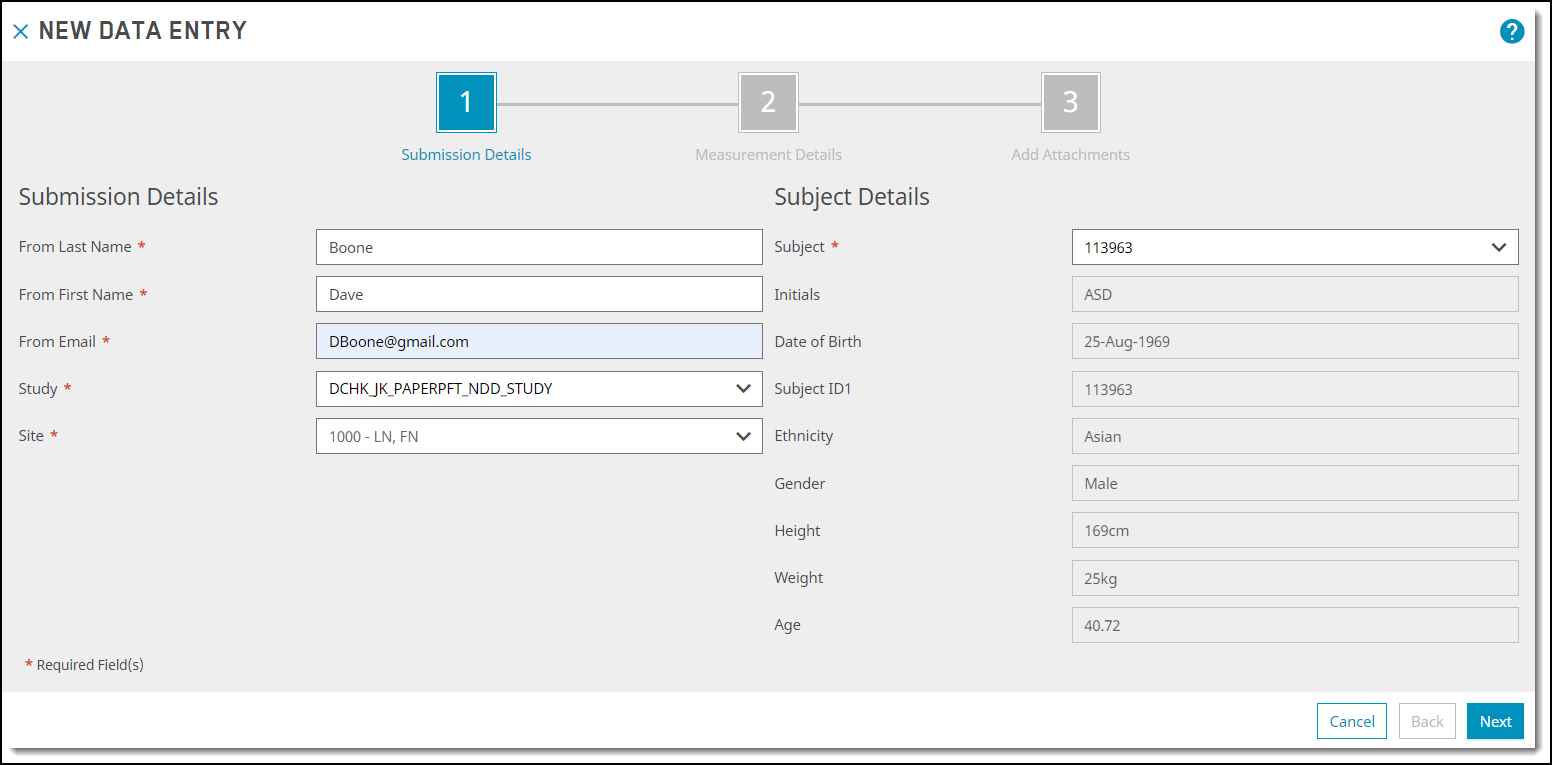
  2. Click the New Data Entry button to initiate the data entry process. A New Data Entry window opens with the Submission Details Step 1 highlighted.

  1. Complete the mandatory fields in the Submission Details section and then select a subject from the drop-down list in the Subject Details section. Optionally, you can click Create New Subject to create a new subject.

  1. If you choose to create a new subject, click Create New Subject and complete the mandatory fields. If an existing subject has been selected, all entry fields that are pre-populated cannot be modified.

  1. Click Next  to proceed to Step 2 of the data entry process. The window for Step 2 Measurement Details opens.

  1. Fill in all required fields at a minimum (required fields are marked with an *). Fields displayed in Step 2 of the entry process will vary based on the data type of the Data Entry (for example, Forced Spirometry, ECG, etc.)

  • In the Technician Details section, make sure that you enter the same exact name for the same technician for every measurement being entered.

  • For the Parameters section, if your PFT machine does not display the effort times, please leave them empty. Also, if any of the parameters are not available please enter “na” instead.

  • For DLCO studies, you can select different units, for example:

  1. After you enter all required information, click Next to proceed to Step 3 of the data entry process. The window for Step 3 Add Attachments opens.

  1. Click the Choose Files button under Add Attachments to select the file(s) to be attached and, optionally, enter descriptions for each file. Click the Delete icon to remove any attachments you added.

Make sure that the attachments do not contain any personal subject information other than the requested details from the Submission Detail page. In the event that this occurs, the submission will be rejected by ERT and will need to be resubmitted.

  1. If you want to submit another data entry for the same patient, click the Add New Entry button. You will be prompted to sign and submit the first entry, and will be directed back to the second step of the Data Entry Wizard, pre-filled with all the information from your first entry. 

  1. At this point you can click the Back button to review any data entered from previous steps.

  2. Check the box to verify there is no personal subject information in the attached document(s), and click the Sign & Submit button to continue the data entry process.

The Sign Create New Data Entry window displays.

  1. Fill in the email and password fields with your ERT Global Account credentials, check the authorization box, and click the Sign button.

A message displays notifying you that the data entry submission was successful.